
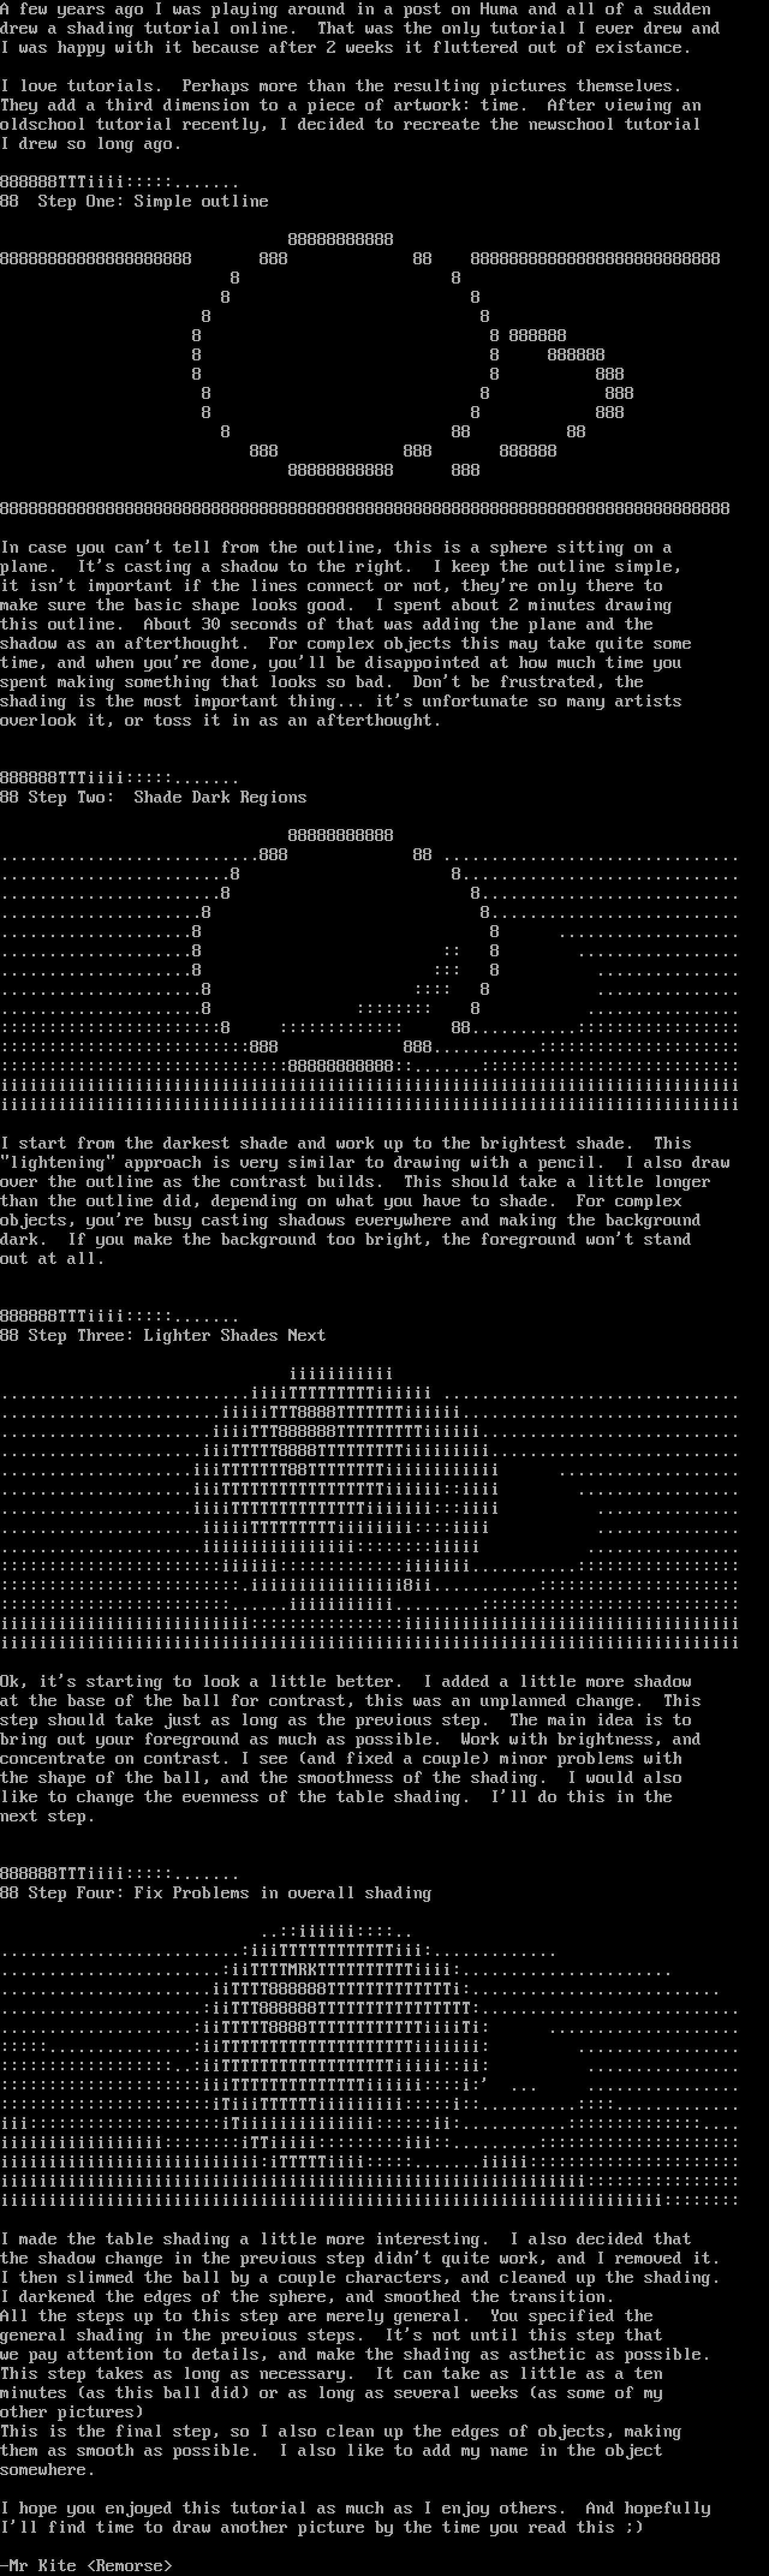
A few years ago I was playing around in a post on Huma and all of a sudden
drew a shading tutorial online. That was the only tutorial I ever drew and
I was happy with it because after 2 weeks it fluttered out of existance.
I love tutorials. Perhaps more than the resulting pictures themselves.
They add a third dimension to a piece of artwork: time. After viewing an
oldschool tutorial recently, I decided to recreate the newschool tutorial
I drew so long ago.
888888TTTiiii:::::.......
88 Step One: Simple outline
88888888888
88888888888888888888 888 88 88888888888888888888888888
8 8
8 8
8 8
8 8 888888
8 8 888888
8 8 888
8 8 888
8 8 888
8 88 88
888 888 888888
88888888888 888
8888888888888888888888888888888888888888888888888888888888888888888888888888
In case you cant tell from the outline, this is a sphere sitting on a
plane. Its casting a shadow to the right. I keep the outline simple,
it isnt important if the lines connect or not, theyre only there to
make sure the basic shape looks good. I spent about 2 minutes drawing
this outline. About 30 seconds of that was adding the plane and the
shadow as an afterthought. For complex objects this may take quite some
time, and when youre done, youll be disappointed at how much time you
spent making something that looks so bad. Dont be frustrated, the
shading is the most important thing... its unfortunate so many artists
overlook it, or toss it in as an afterthought.
888888TTTiiii:::::.......
88 Step Two: Shade Dark Regions
88888888888
...........................888 88 ...............................
........................8 8.............................
.......................8 8...........................
.....................8 8..........................
....................8 8 ...................
....................8 :: 8 .................
....................8 ::: 8 ...............
.....................8 :::: 8 ...............
.....................8 :::::::: 8 ................
:::::::::::::::::::::::8 ::::::::::::: 88...........:::::::::::::::::
::::::::::::::::::::::::::888 888...........:::::::::::::::::::::
::::::::::::::::::::::::::::::88888888888::.......:::::::::::::::::::::::::::
iiiiiiiiiiiiiiiiiiiiiiiiiiiiiiiiiiiiiiiiiiiiiiiiiiiiiiiiiiiiiiiiiiiiiiiiiiiii
iiiiiiiiiiiiiiiiiiiiiiiiiiiiiiiiiiiiiiiiiiiiiiiiiiiiiiiiiiiiiiiiiiiiiiiiiiiii
I start from the darkest shade and work up to the brightest shade. This
lightening approach is very similar to drawing with a pencil. I also draw
over the outline as the contrast builds. This should take a little longer
than the outline did, depending on what you have to shade. For complex
objects, youre busy casting shadows everywhere and making the background
dark. If you make the background too bright, the foreground wont stand
out at all.
888888TTTiiii:::::.......
88 Step Three: Lighter Shades Next
iiiiiiiiiii
..........................iiiiTTTTTTTTTiiiiii ...............................
.......................iiiiiTTT8888TTTTTTTiiiiii.............................
......................iiiiTTT888888TTTTTTTTTiiiiii...........................
.....................iiiTTTTT8888TTTTTTTTTiiiiiiiii..........................
....................iiiTTTTTTT88TTTTTTTTiiiiiiiiiiii ...................
....................iiiTTTTTTTTTTTTTTTTTiiiiii::iiii .................
....................iiiiTTTTTTTTTTTTTTiiiiiii:::iiii ...............
.....................iiiiiTTTTTTTTTiiiiiiii::::iiii ...............
.....................iiiiiiiiiiiiiiii::::::::iiiii ................
:::::::::::::::::::::::iiiiii:::::::::::::iiiiiii...........:::::::::::::::::
:::::::::::::::::::::::::.iiiiiiiiiiiiiiii8ii...........:::::::::::::::::::::
::::::::::::::::::::::::......iiiiiiiiiii.........:::::::::::::::::::::::::::
iiiiiiiiiiiiiiiiiiiiiiiiii::::::::::::::::iiiiiiiiiiiiiiiiiiiiiiiiiiiiiiiiiii
iiiiiiiiiiiiiiiiiiiiiiiiiiiiiiiiiiiiiiiiiiiiiiiiiiiiiiiiiiiiiiiiiiiiiiiiiiiii
Ok, its starting to look a little better. I added a little more shadow
at the base of the ball for contrast, this was an unplanned change. This
step should take just as long as the previous step. The main idea is to
bring out your foreground as much as possible. Work with brightness, and
concentrate on contrast. I see and fixed a couple minor problems with
the shape of the ball, and the smoothness of the shading. I would also
like to change the evenness of the table shading. Ill do this in the
next step.
888888TTTiiii:::::.......
88 Step Four: Fix Problems in overall shading
..::iiiiii::::..
.........................:iiiTTTTTTTTTTTTiii:.............
.......................:iiTTTTMRKTTTTTTTTTTiiii:......................
......................iiTTTT888888TTTTTTTTTTTTTi:..........................
.....................:iiTTT888888TTTTTTTTTTTTTTTT:...........................
....................:iiTTTTT8888TTTTTTTTTTTTiiiiTi: ....................
:::::...............:iiTTTTTTTTTTTTTTTTTTTTiiiiiii: .................
::::::::::::::::::..:iiTTTTTTTTTTTTTTTTTTiiiii::ii: ................
:::::::::::::::::::::iiiTTTTTTTTTTTTTTiiiiii::::i: ... ................
::::::::::::::::::::::iTiiiTTTTTTiiiiiiiii:::::i::..........::::.............
iii::::::::::::::::::::iTiiiiiiiiiiiiii::::::ii:...........::::::::::::::....
iiiiiiiiiiiiiiiii::::::::iTTiiiii:::::::::iii::.........:::::::::::::::::::::
iiiiiiiiiiiiiiiiiiiiiiiiiii:iTTTTTiiii:::::.......iiiii::::::::::::::::::::::
iiiiiiiiiiiiiiiiiiiiiiiiiiiiiiiiiiiiiiiiiiiiiiiiiiiiiiiiiiiii::::::::::::::::
iiiiiiiiiiiiiiiiiiiiiiiiiiiiiiiiiiiiiiiiiiiiiiiiiiiiiiiiiiiiiiiiiiiii::::::::
I made the table shading a little more interesting. I also decided that
the shadow change in the previous step didnt quite work, and I removed it.
I then slimmed the ball by a couple characters, and cleaned up the shading.
I darkened the edges of the sphere, and smoothed the transition.
All the steps up to this step are merely general. You specified the
general shading in the previous steps. Its not until this step that
we pay attention to details, and make the shading as asthetic as possible.
This step takes as long as necessary. It can take as little as a ten
minutes as this ball did or as long as several weeks as some of my
other pictures
This is the final step, so I also clean up the edges of objects, making
them as smooth as possible. I also like to add my name in the object
somewhere.
I hope you enjoyed this tutorial as much as I enjoy others. And hopefully
Ill find time to draw another picture by the time you read this
-Mr Kite Remorse
FILE
invert
PREVIEW

SAUCE
- title
- Shading Tutorial
- author
- Mr. Kite
- group
- Remorse Productions
- date
- 1998-01-04
- comments
- datatype
- character
- filetype
- ascii
META - TAGS
- artist(s)
- group(s)
- content
copy tags navigation report a problem
log in to add a comment.