
s Guide to Making a Fairly Good ASCII Logo. @m
welp, i looked through the of asciis that i did for one drawing and saved themconsistantly like gland1.asc, gland2.asc, etc. and realized that these were
the steps i used to make logos, so i rounded them all up and put them here with
little explanations of each one and here we go!
i really really think it will be helpful to newer asciiers, we need you guys to
be the next great arteests mango!
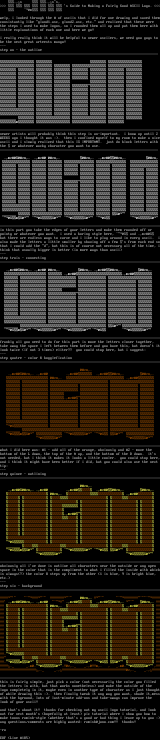
step un - the outline
newer artists will probably think this step is un-important. i know up until 2
WEEKS ago i thought it was :. then i confined myself to my room to make a niceascii and i slowly realized that this IS IMPORTANT. just do block letters with
the or whatever wacky character you want to use.
.,m@S@n,. .,m@ @n,. @n,. .,m@@n,. @n,
S@
@SmS@ @SS@ @SS@ @S @SS@
in this part you take the edges of your letters and make them rounded off or
pointy or whatever you want. i used a boring style here, @S and .,m@S
but there are endless ways to curve and i like to play around in every ascii. ialso made the letters a little smaller by shaving off a few s from each end sothat i could add the d, but this is of course not necessary all of the time, ithink that usually bigger is better in more ways than ascii
step trois - connecting
.,m@S@n,. .,m@ @n,. @n,. .,m@@n,. @n,.
.,m@.,m@
S@
@SmS@@SS@@SS@@S @SS@
frankly all you need to do for this part is move the letters closer together,
take away the space i left between them before and you have this, but doesnt itlook twice if not 3 times eliter?? you could stop here, but i suggest:
step quatre - color bogglefication
@n,.
.,m@S@n,. .,m@ .,m@ .,m@@n,. @n,.
@n,. .,m@
.,m@
@S
@SmS@ @SS@ @S S@
@SS@ @SS@
what i did here was: 1 - add all of the orange, obviously and 2 - move the
bottom of the L down, the top of the A up, and the bottom of the D down. its
not needed, but i think it makes it looks a little cooler. you could stop here,and i think it might have been better if i did, but you could also use the next
tip:
step quinze - outlining
@n,.
.,m@S@n,. .,m@ .,m@ .,m@@n,. @n,.
@n,. .,m@
.,m@
@S
@SmS@ @SS@ @S S@
@SS@ @SS@
obviously all ive done is outline all characters near the outside or any open
space in the color that is the compliment to what i filled the inside with whichis always? the color 8 steps up from the other 1 is blue, 9 is bright blue,
etc.
step six - background
!!!! !!! !!!!!!! @n,. ! !!!!!!!!!!!!! .,m@S@n,. .,m@ ! .,m@ .,m@@n,. @n,. !!!! @n,. .,m@ !!!! !!!! !!!! !!!! !!!! .,m@ !!!! !!!! !!!! !!!! !!!! !!!! !!!!.@S !!!! !!!!.@SmS@ @SS@ @S S@ !!!!!!. .m@.@SS@.!@,. .,@!!m,. , .m@.@SS@,!!!!!!!!!!!!!!!!!!!!,. .,!!!!!!!!!!!!!!!!!!!!!!!!!!!!!!!!@,. .,!!!!
this is fairly simple, just pick a color not necessarily the color you filled
the letters in with, but that works nonetheless and make the outside of the
logo completely in it, maybe even in another type of character as i just thoughtof while drawing this :. then finally tweak it any way you want, shade it,messwith the bground, lots of last-minute add-ons and take-aways can improve the
look of your ascii!
and thats about it! thanks for checking out my ascii logo tutorial, and look
out for next months hopefully at least pic tutorial where i show you how to
make toons rumish-style whether thats a good or bad thing i leave up to you :any questions/comments are highly wanted: rumish@juno.com!! thanks!
-ru
EOF Line 185
welp, i looked through the of asciis that i did for one drawing and saved themconsistantly like gland1.asc, gland2.asc, etc. and realized that these were
the steps i used to make logos, so i rounded them all up and put them here with
little explanations of each one and here we go!
i really really think it will be helpful to newer asciiers, we need you guys to
be the next great arteests mango!
step un - the outline
newer artists will probably think this step is un-important. i know up until 2
WEEKS ago i thought it was :. then i confined myself to my room to make a niceascii and i slowly realized that this IS IMPORTANT. just do block letters with
the or whatever wacky character you want to use.
.,m@S@n,. .,m@ @n,. @n,. .,m@@n,. @n,
S@
@SmS@ @SS@ @SS@ @S @SS@
in this part you take the edges of your letters and make them rounded off or
pointy or whatever you want. i used a boring style here, @S and .,m@S
but there are endless ways to curve and i like to play around in every ascii. ialso made the letters a little smaller by shaving off a few s from each end sothat i could add the d, but this is of course not necessary all of the time, ithink that usually bigger is better in more ways than ascii
step trois - connecting
.,m@S@n,. .,m@ @n,. @n,. .,m@@n,. @n,.
.,m@.,m@
S@
@SmS@@SS@@SS@@S @SS@
frankly all you need to do for this part is move the letters closer together,
take away the space i left between them before and you have this, but doesnt itlook twice if not 3 times eliter?? you could stop here, but i suggest:
step quatre - color bogglefication
@n,.
.,m@S@n,. .,m@ .,m@ .,m@@n,. @n,.
@n,. .,m@
.,m@
@S
@SmS@ @SS@ @S S@
@SS@ @SS@
what i did here was: 1 - add all of the orange, obviously and 2 - move the
bottom of the L down, the top of the A up, and the bottom of the D down. its
not needed, but i think it makes it looks a little cooler. you could stop here,and i think it might have been better if i did, but you could also use the next
tip:
step quinze - outlining
@n,.
.,m@S@n,. .,m@ .,m@ .,m@@n,. @n,.
@n,. .,m@
.,m@
@S
@SmS@ @SS@ @S S@
@SS@ @SS@
obviously all ive done is outline all characters near the outside or any open
space in the color that is the compliment to what i filled the inside with whichis always? the color 8 steps up from the other 1 is blue, 9 is bright blue,
etc.
step six - background
!!!! !!! !!!!!!! @n,. ! !!!!!!!!!!!!! .,m@S@n,. .,m@ ! .,m@ .,m@@n,. @n,. !!!! @n,. .,m@ !!!! !!!! !!!! !!!! !!!! .,m@ !!!! !!!! !!!! !!!! !!!! !!!! !!!!.@S !!!! !!!!.@SmS@ @SS@ @S S@ !!!!!!. .m@.@SS@.!@,. .,@!!m,. , .m@.@SS@,!!!!!!!!!!!!!!!!!!!!,. .,!!!!!!!!!!!!!!!!!!!!!!!!!!!!!!!!@,. .,!!!!
this is fairly simple, just pick a color not necessarily the color you filled
the letters in with, but that works nonetheless and make the outside of the
logo completely in it, maybe even in another type of character as i just thoughtof while drawing this :. then finally tweak it any way you want, shade it,messwith the bground, lots of last-minute add-ons and take-aways can improve the
look of your ascii!
and thats about it! thanks for checking out my ascii logo tutorial, and look
out for next months hopefully at least pic tutorial where i show you how to
make toons rumish-style whether thats a good or bad thing i leave up to you :any questions/comments are highly wanted: rumish@juno.com!! thanks!
-ru
EOF Line 185
log in to add a comment.